Nothing makes a tour operator look more unprofessional and unappealing than low quality photos, particularly on their website(opens in a new tab).
Let’s look at this tour operator from Florida as an example; I’ve blurred their name from their website to not embarrass them. They offer boat tours of a beautiful town on Florida’s Atlantic coast. Now tell me, based on the photos on their site, would you be excited to take a tour with this company?
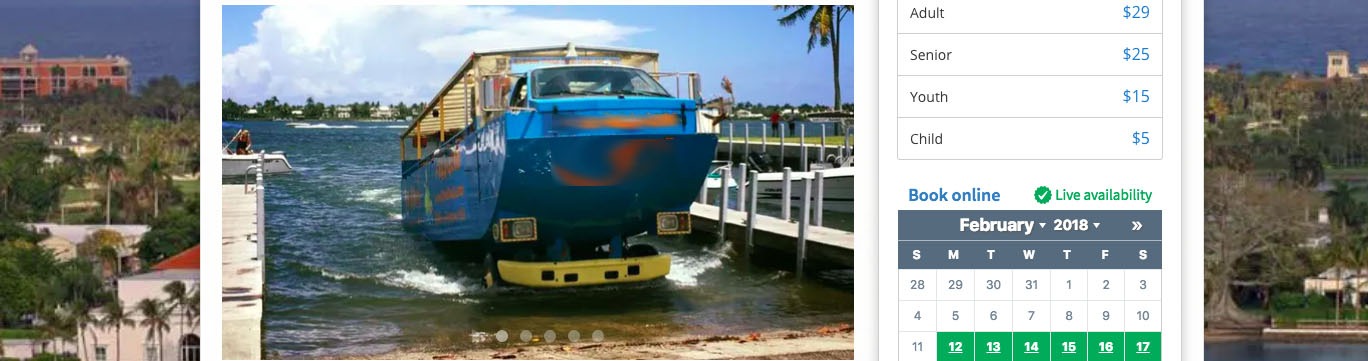
The area of Florida that this tour is in is beautiful, boasting stunning views and scenery. These photos just don’t do it justice. Let’s start with the center photo. It’s a photo of the waterbus going into the water. The glaring issue here is that nothing is in focus, and the photo is blurry. Aside from that, the photo’s lighting and angle highlights the murky shore and seaweed. It doesn’t look like it’s going to be a beautiful ride through Florida’s beautiful and blue ocean, something other Florida tour operators(opens in a new tab) offer and show off with the photos on their website.
Unfortunately, it only gets worse for this Florida tour operator. When you scroll further down the site, you see this photo of the waterbus:

To be honest, this photo terrifies me. Aside from the photo being blurry, the way the bus/boat hybrid is hitting the water does not suggest a relaxing ride! It looks like I’m about to get a serious case of whiplash, and the photo’s over-exposure and harsh contrast are only adding to my feelings of discomfort and disorientation.
There’s no way to tell which type of camera this tour operator used to take photos, but I’m certain that if they had known how to use an iPhone, a quick snap with it would have done a better job.
Now you may subscribe to the old-fashioned way of thinking that you can only take a quality photo with an expensive camera. If you are, let me just remind you of Apple’s “Shot on iPhone” campaign. If you haven’t seen it, you can check out some great photos on Apple’s Instagram(opens in a new tab), all shot with an iPhone.
Having great, high-quality, professional photos is one of the most important aspects for a tour operator. For one, having beautiful photos will make others want to go on your tours and see the sites for themselves.
In addition, having high-quality photos will also add legitimacy to your tours. People are paying for the experience, and they want to feel like they’re giving their money to an experienced and professional tour operator. The quality of your website’s photos is the easiest way to portray professionalism and the quickest way to turn people off if you don’t get it right. If you have blurry, badly lit photos, they won’t take you seriously, and your tours will appear unappealing and unattractive.
In days gone by, the only way to ensure you had website-ready shots was to purchase an expensive camera or hire a professional photographer. Today, all you need is access to an iPhone, preferably a recent version, and an idea of how to take great photos using an iPhone.

To help, I’ve created a simple guide to teach you how to take great photos with an iPhone.
THE BASICS
In this section I’m going to give you the basics of shooting photos with an iPhone. If you already feel comfortable shooting with your iPhone and you have basic skills such as the ability to control focus and exposure, you might want to skip this section. If not, welcome aboard!
Focus
Your camera will automatically focus on something in the shot: a yellow square will appear around the object that is being focused. If you want to change what your camera is focusing on, simply tap the screen. Another yellow box will appear, and that means that your desired object is being focused on. Let’s say you are a tour operator who runs tours with your van, and you want to take a photo of the van with beautiful scenery in the background. All you have to do is tap the object you want focused, and the yellow square will appear. From there, you can take the photo if it looks the way you want.
If not, you should adjust the exposure…
Exposure
When you tap to focus, the camera will automatically adjust the exposure, but if it’s not how you want it, you can also manually adjust it. When you tap an object on the screen, a little sun icon will appear on the right side of the square. Just slide the sun up and down to adjust the exposure to how you want it. See below: the sun is on the bottom half of the yellow line, and the photo has a low exposure.
Horizontal
For most purposes, you should hold your camera horizontally. The photos will look better, especially since in the world of iPhones, vertical photos tip off people immediately that the photo was taken with an iPhone.
One very helpful feature of holding your phone horizontally while taking the photo is that you can use the volume button as the clicker. This will allow you to hold the camera steady, and in turn, your photos will look less blurry, especially in poor lighting.
Okay, now that you have the basics down, we can move on.
Let’s talk about how to actually take high-quality photos with an iPhone for your tour site or social pages.
Magic Hour
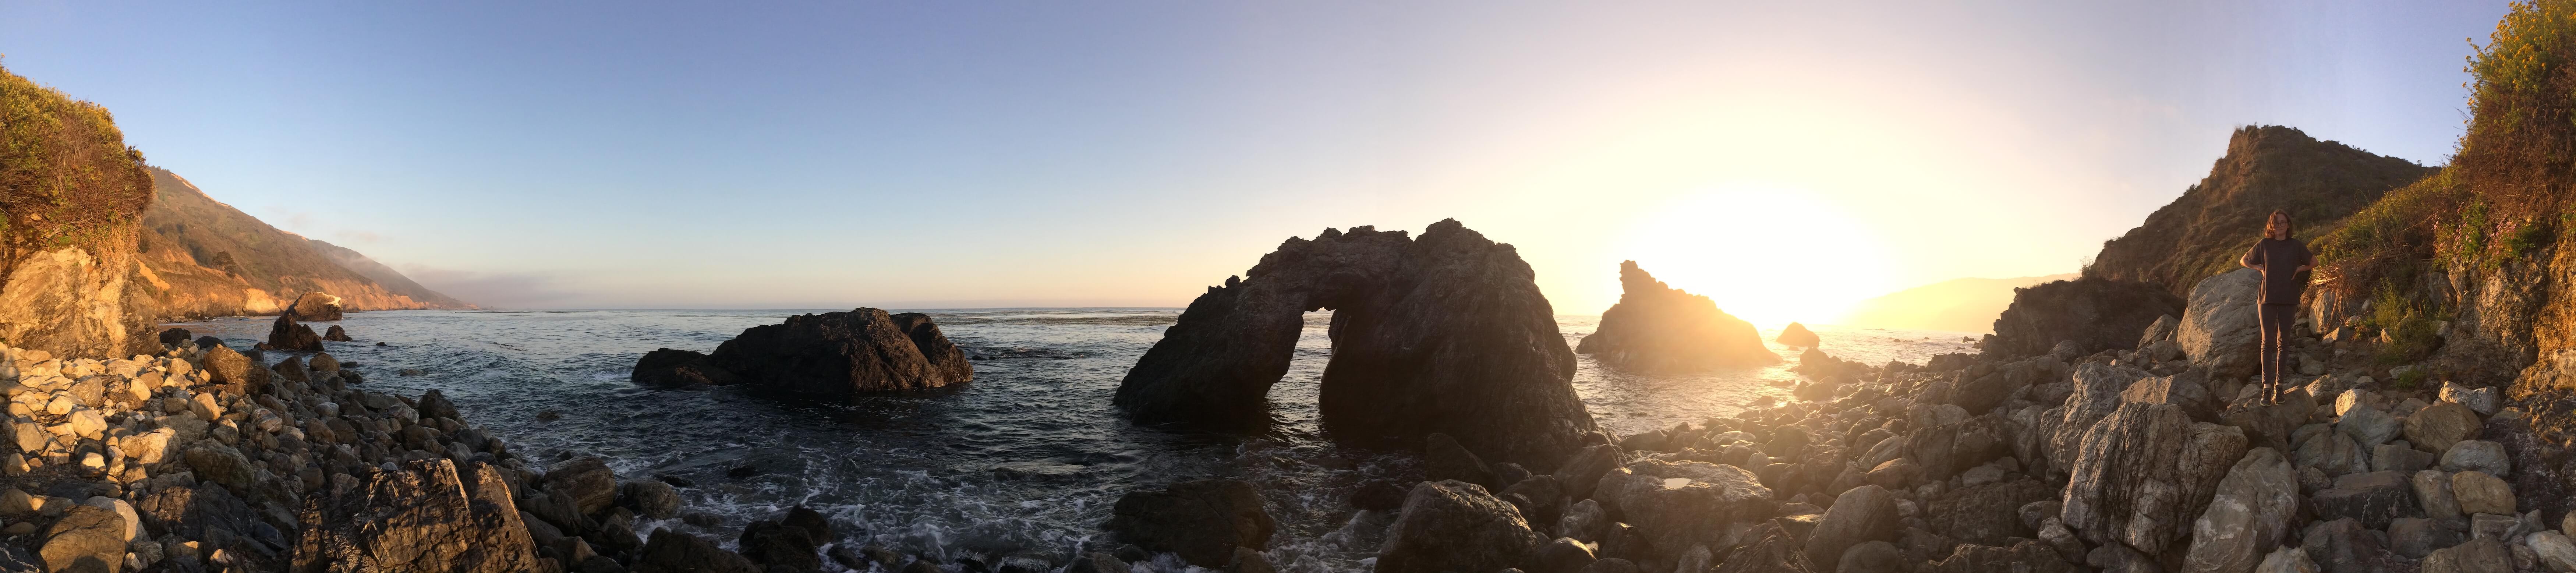
If you want to take particularly stunning photos of your tours and location, consider shooting right before sunset or right after sunrise. Since your tours are probably conducted during the day time, you don’t want to wait to shoot when it’s too dark, but with this strategy in mind, you can certainly take a beautiful photo with golden light without it being too dark.
You’ll want to hold your camera very steady if you want to capture great photos during the Magic or Golden Hour, since the light isn’t very bright. This is also a great time to manually play around with your exposure, since in this lighting, if you focus on one area, the automatic exposure will make most of the shot dark.
HDR
The magic hour photo above was also made possible with the HDR feature. HDR means High Dynamic Range, which means that in HDR mode the camera can see a higher range from the darkest dark colors to the lightest light colors. To turn this feature on, just click HDR at the top of your screen in the camera app. It will look like this: 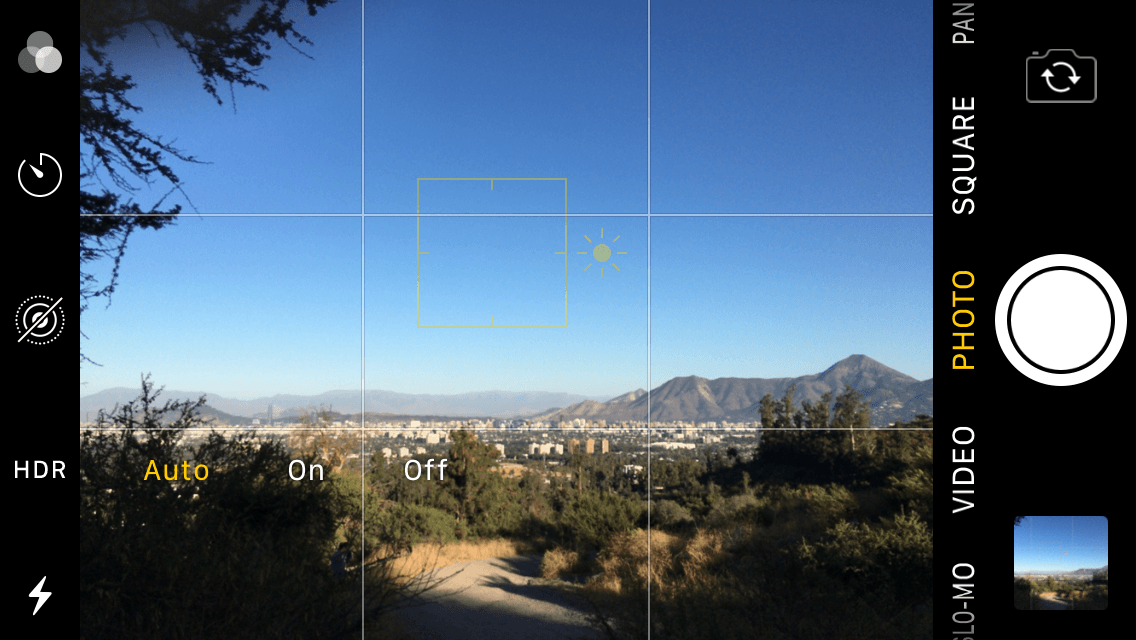
From there, just tap “on”, and it will turn yellow.
Let’s say you’re taking a photo of your tour group hiking up a hill, and in the shot they’ll be backlit by the sun and bright blue sky. If you are not in HDR mode, the sky will either be overexposed but the people visible, or the sky will look normal, but the photo will only show a silhouette of the people. But in HDR mode, it will take two shots, of both types of exposures and combine them into one great photo where both the people and sky are visible. Unfortunately, it doesn’t always work perfectly, but it will certainly improve your chances of taking a great photo! You can also set your phone to save both the HDR photo and regular photo, so you really have nothing to lose from leaving HDR mode on all the time.
I didn’t take this photo myself, but I think it is a great example of what HDR can do:

Portrait Mode
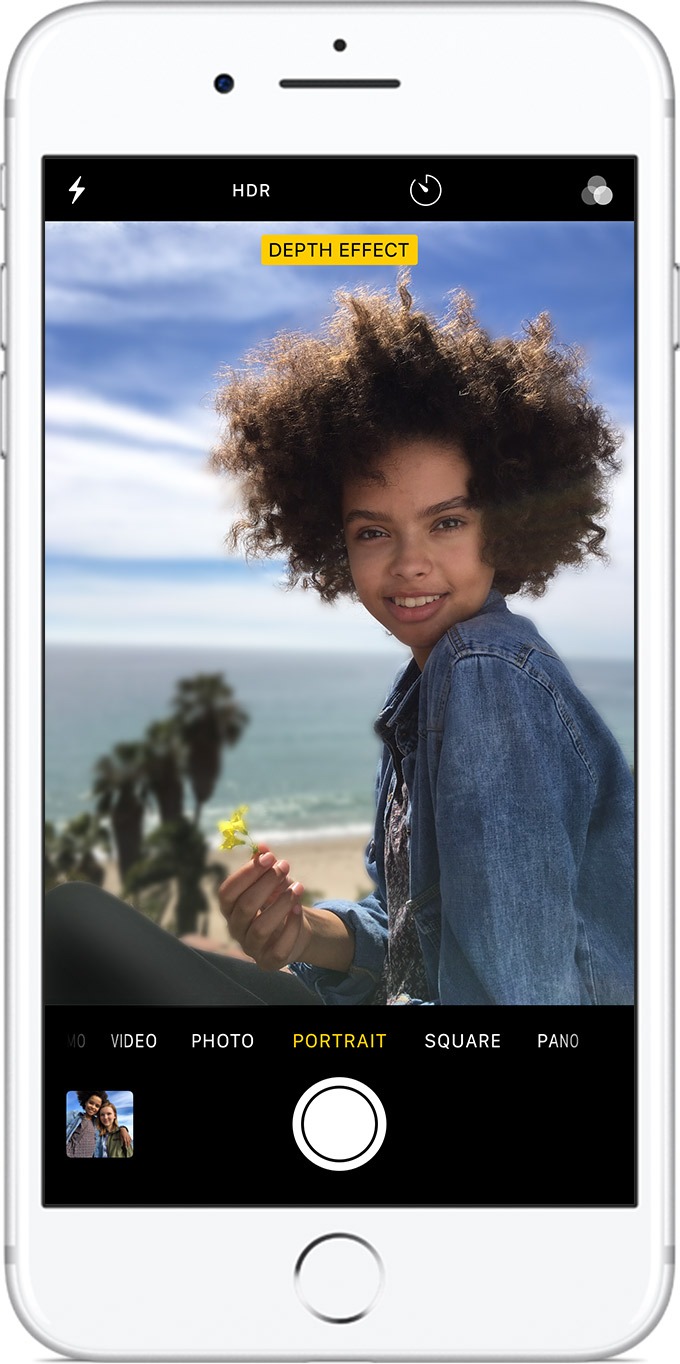
If your iPhone has portrait mode, you should definitely be using it when taking photos of your guests or your guides. Only the iPhone 7 Plus, 8 Plus, and X have this feature, but if you are looking to take photos of your guides for your “About Us” page, you should see if anyone you know has one of these iPhones for you to borrow because the portrait mode photos will look very professional. Portrait mode gives you instructions while you’re gearing up to take the photo: it will tell you if the area is too dark, too close, or too far.The best part of portrait mode is that it will add a depth effect to your photo, and you can see an example of this in the photo here. And, if you later decide that you don’t want that photo to have the depth effect, you can remove it by clicking edit then tapping “portrait” at the top of your screen. This will remove the effect, and if you want to add it back, all you have to to do is re-tap “portrait”.
Quick Tips
Don’t Zoom
Zooming with an iPhone is a quick way to take a really terrible photo! Instead of zooming, just get closer to your subject, if you can.
Burst
If you’re trying to get a great action shot for your website, say of one of your guests surfing or mountain biking, try shooting in burst mode. Burst mode will allow you to capture every movement and moment by taking a high number of photos extremely fast, and you can choose the best action shot later.
To shoot a burst, just hold down the capture button for as long as you please, and your phone will rapidly take photos. You can then choose which ones to keep out of the perhaps dozens of photos you just took by going to your photos, clicking the one you did the burst for, then tapping “select” at the bottom of the screen. Here you can look through the photos in the burst and tap the ones you like (a blue checkmark will appear on the bottom right of the photo). Once you click “done”, it will ask you if you want to keep all the photos or just the three you selected. If you click “Keep Everything”, the entire burst will be saved, but the ones you selected will show up in your photo library as regular photos, not as part of a burst.
If you’re not able to hire a professional photographer or rent a high-quality camera, I hope this guide helps you improve the content of your tour and activity website. And remember: you can always edit the photos using Photoshop or even Apple’s Photos app to further improve the quality. For more photography tips, check out this blog post(opens in a new tab). And if you need a new website to showcase your amazing photos, contact us(opens in a new tab).
Find this article useful? Enter your details below to receive your FREE copy of 95 Epic Places To List Your Tours and receive regular updates from Tourism Tiger and leading industry experts.
By submitting this form you agree to Tourism Tiger contacting you via email.